
Why go with a piercing pal
Getting your first piercing is a mix of excitement and nerves. Having a trusted friend by your side changes the entire experience from a solitary medical procedure into a shared memory. This "piercing pals" dynamic isn't just about social support; it’s a practical strategy for staying calm and making better decisions in the moment.
When you’re alone, anxiety can make you rush through choices or ignore small red flags. A friend acts as a second set of eyes, helping you evaluate the studio’s cleanliness and the piercer’s professionalism. They can hold your hand—literally—during the procedure, providing a physical anchor that lowers your heart rate and reduces the urge to flinch.
Beyond the immediate comfort, sharing this milestone creates a stronger bond. You’re not just getting metal through your skin; you’re navigating a small rite of passage together. This shared vulnerability often leads to a more positive outcome, as you’re more likely to follow aftercare instructions when you have someone to check in with and encourage you.
Pick your piercings together
Choosing your first piercings as a pair is about finding styles that complement both your anatomy and your shared aesthetic. Instead of picking random spots, look at your ear and nose profiles together to see where jewelry will sit naturally. This collaborative approach ensures both of you feel confident in your choices from day one.
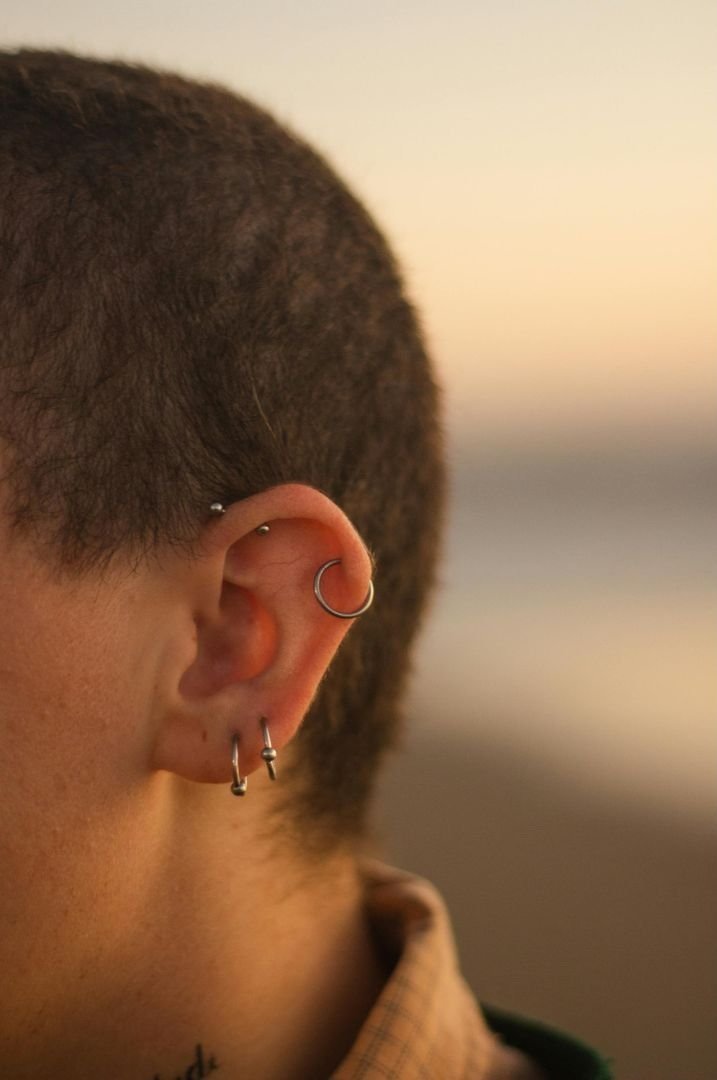
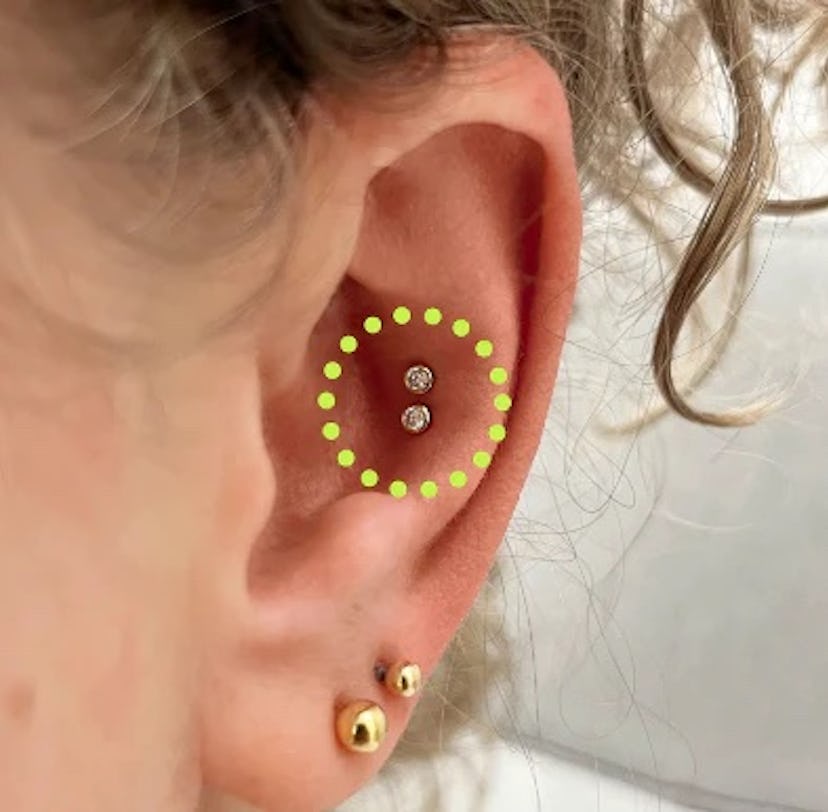
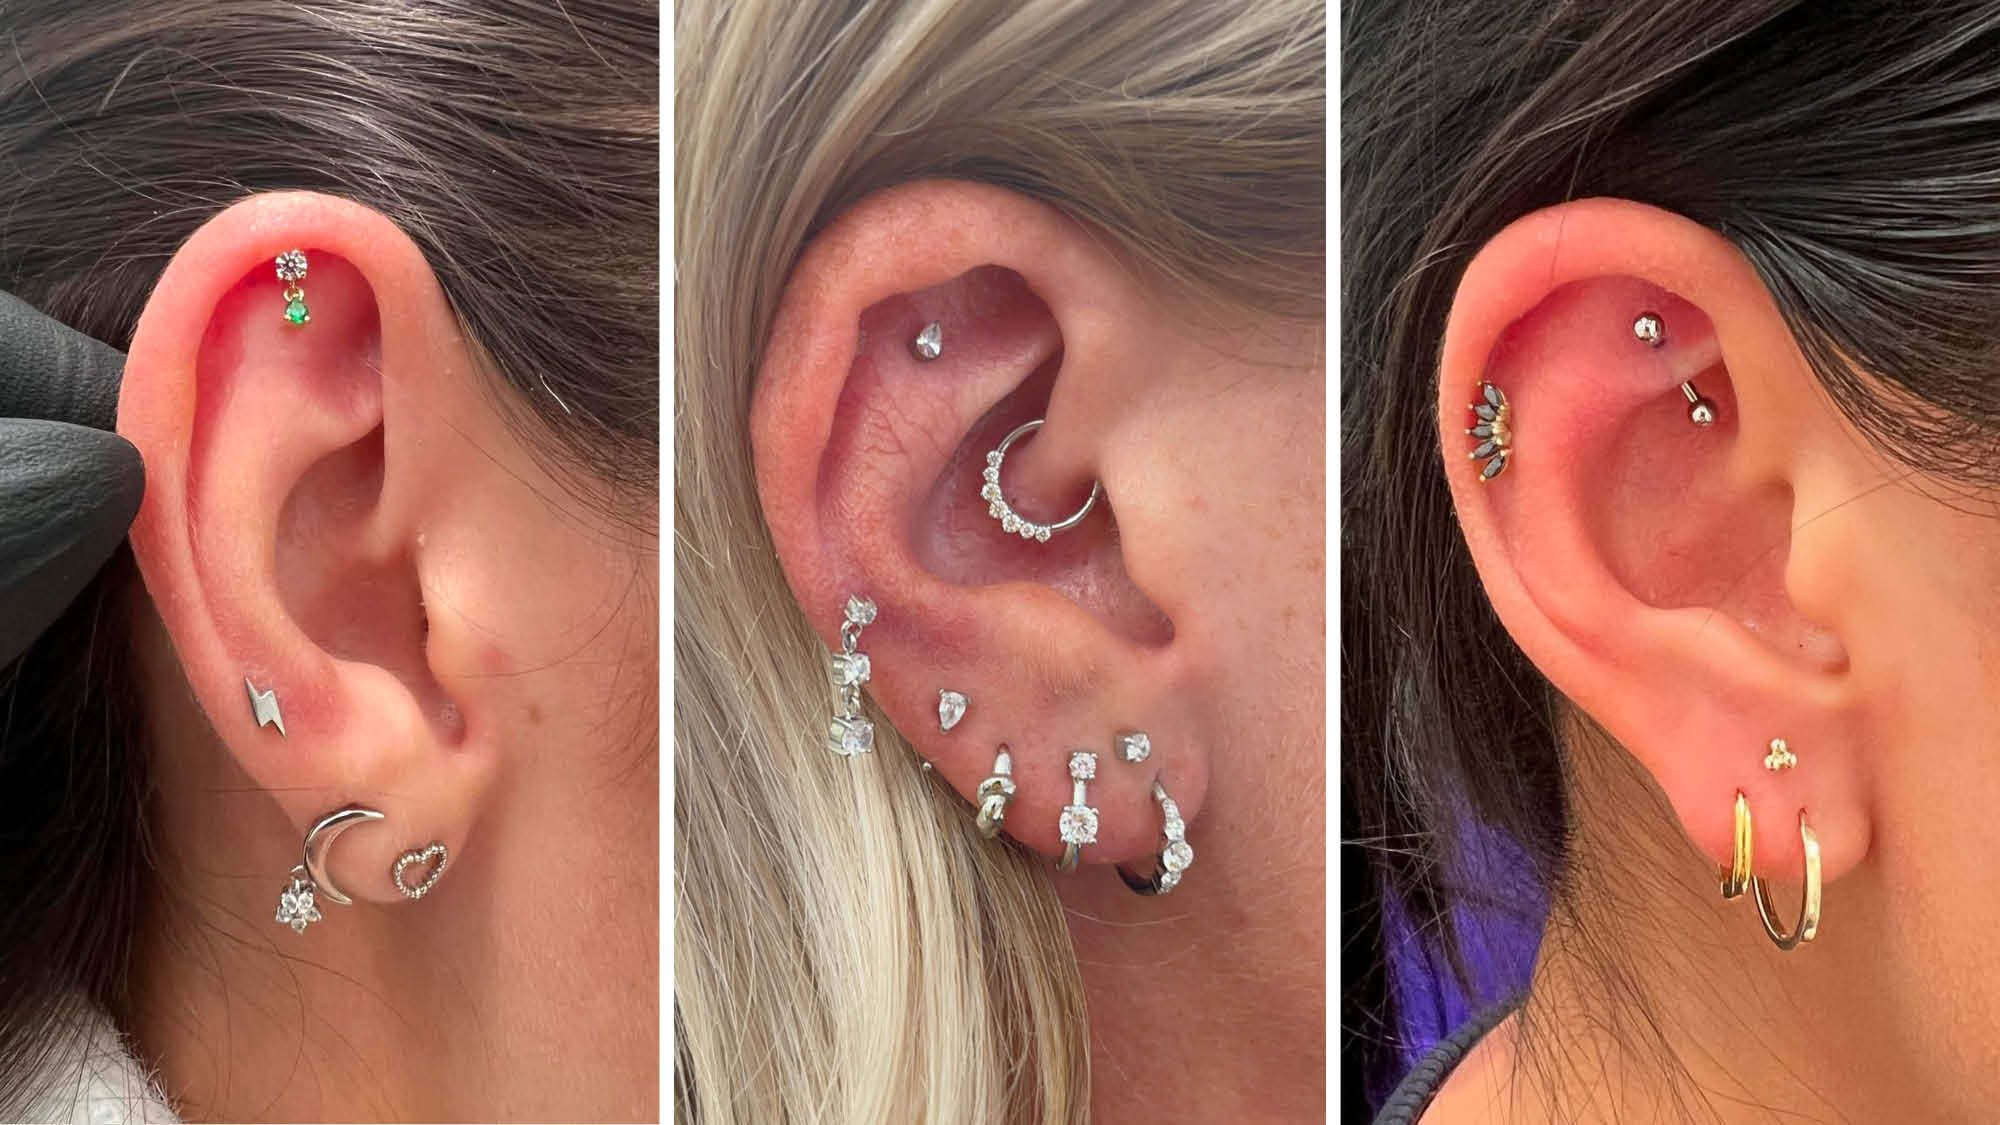
Start by mapping out your preferred areas. The helix sits on the upper cartilage ridge and offers a versatile spot for hoops or studs. The septum hangs in the center of the nose, making it a bold but easily concealable option. The daith rests in the innermost cartilage fold, providing a subtle, textured look, while the smiley piercing hooks under the upper lip for a playful surprise.
Consider how these placements interact with your daily routine. Cartilage piercings like the helix and daith require more careful sleeping habits than lobe or smiley piercings. Discuss these healing realities openly so you can support each other through the recovery process without frustration.
The Step-by-Step Piercing Process
Walking into your first piercing appointment can feel like standing in front of a locked door. You don't need to know the combination beforehand; you just need to follow the guide. This section breaks down the appointment into clear, manageable steps so you and your Piercing Pal can move through the process with confidence.
Consultation and Health Check
Your journey begins with a conversation. The piercer will review your health history to ensure you are a good candidate for the specific piercing you want. They will check for conditions that might affect healing, such as keloid scarring tendencies, blood disorders, or immune system issues. This is also the time to discuss placement preferences. If you and your Pal have saved inspiration photos, this is the moment to show them. The piercer will explain which jewelry styles work best for your anatomy and healing timeline.
Marking the Placement
Once you agree on the spot, the piercer will mark the site with a surgical marker. This step is critical because it determines how the piercing will sit on your body. Stand in front of a mirror together. Check the height, symmetry, and angle. If it looks off, speak up now. It is much easier to adjust a dot of ink than to fix a crooked hole. Both you and your piercer should agree that the mark is exactly where you want it before the needle touches skin.
The Piercing Moment
The actual piercing is faster than most people expect. The piercer will clean the area with an antiseptic and then use a sterile, hollow needle to create the opening. The needle is sharp and hollow, meaning it removes a tiny core of tissue rather than tearing it. This causes less trauma than a piercing gun, which forces jewelry through the skin. You will feel a quick pinch or pressure, followed by a warm sensation. Breathe through it. Your Piercing Pal can hold your hand during this part if it helps you stay calm.
Proper sterile setup ensures safety during the procedure.
Jewelry Insertion
Immediately after the needle passes through, the piercer slides the jewelry into the new hole. This jewelry is usually implant-grade titanium, niobium, or 14k gold, designed to minimize allergic reactions. For new piercings, the jewelry will be slightly longer than your final piece to accommodate swelling. The piercer will secure the ends with clean hands or sterile gloves. This is a good time to admire your new look in the mirror before the aftercare instructions begin.
Aftercare Briefing
Before you leave, the piercer will give you a detailed aftercare sheet. This is not optional paperwork; it is your roadmap to healing. Listen closely to instructions on how to clean the site, what products to avoid, and how long to leave the jewelry in. Ask questions if anything is unclear. Good aftercare prevents infection and ensures your piercing heals smoothly, keeping the experience positive for both you and your Pal.
Healing and aftercare basics
Healing is a biological process that demands consistency, and having a piercing pal changes the game by adding a layer of accountability. You might skip a rinse when you’re tired, but your pal won’t let you forget. This shared responsibility helps you stick to the routine that keeps infection at bay and ensures your piercings heal cleanly and quickly.
The gold standard for aftercare is simple saline solution. Use a sterile pre-mixed saline spray or make your own with non-iodized sea salt and distilled water. Spray the area twice a day, let it sit for a few minutes to soften any crusties, and gently pat it dry with a clean paper towel. Avoid cotton balls, as fibers can get caught in the jewelry and irritate the fresh wound. Mayo Clinic advises against using alcohol or hydrogen peroxide, which can damage healing cells and delay recovery.
Your hands are the biggest source of bacteria, so resist the urge to touch, twist, or play with your new jewelry. Every time you touch it, you’re introducing germs and disrupting the delicate healing tissue forming around the stud or ring. If you need to clean it, wash your hands thoroughly first. Keep hair products, lotions, and makeup away from the site to prevent clogging and irritation.
Here is a simple daily checklist to keep you and your pal on track:
- Rinse with sterile saline solution twice daily.
- Gently dry the area with a clean paper towel.
- Inspect for signs of redness, swelling, or unusual discharge.
- Avoid touching or twisting the jewelry.
- Keep hair and skincare products away from the site.
Common mistakes to avoid
Healing a piercing is a shared responsibility, but it’s easy to slip up when you’re excited about the new look. Even well-meaning friends can accidentally hinder the process by treating a fresh piercing like a finished accessory. To keep your healing journey smooth and complication-free, steer clear of these frequent errors.
Changing jewelry too early
The urge to swap out the initial stud for something more decorative is strong, but patience is your best tool. Professional piercers recommend waiting until the tissue has fully closed and stabilized before changing jewelry. Removing the initial piece too soon can cause the hole to close or trap bacteria inside, leading to infection. Let your piercer guide you on when the timing is right for that first upgrade.
Using harsh cleaners
Saline solution is the gold standard for aftercare, but many people reach for alcohol, hydrogen peroxide, or harsh soaps instead. These products are too aggressive for open wounds; they dry out the skin and kill the healthy cells needed for regeneration. Stick to a sterile saline spray twice a day and let warm water do the rest during showers. Avoid twisting or spinning the jewelry, as this irritates the healing fistula.
Ignoring signs of infection
It’s normal to have some redness and mild swelling for the first few days, but persistent pain, heat, or yellow-green discharge is not. Don’t try to treat an infection with home remedies or ignore it hoping it will pass. If symptoms worsen or don’t improve after a week, see a medical professional. Early intervention prevents minor issues from becoming serious health problems.
Understanding piercing costs
When you and your piercing pal plan your first session, knowing the price range helps avoid surprise fees. The total cost usually breaks down into two parts: the piercing fee (the professional service) and the initial jewelry. Studios often bundle these, but it’s smart to ask for a detailed quote so you can budget accurately.
Prices vary based on location and studio reputation. Cartilage piercings like helix or daith often cost more than lobe piercings because they require more precision. Septum and smiley piercings have their own pricing tiers due to the specific tools and expertise needed. Below is a general comparison of average costs for common first-time piercings, including standard starter jewelry.
| Piercing Type | Service Fee | Basic Jewelry | Estimated Total |
|---|---|---|---|
| Earlobe | $20-$30 | $10-$20 | $30-$50 |
| Helix | $30-$45 | $15-$30 | $45-$75 |
| Septum | $40-$55 | $20-$40 | $60-$95 |
| Daith | $45-$60 | $20-$40 | $65-$100 |
| Smiley | $35-$50 | $15-$30 | $50-$80 |
Remember that high-quality jewelry, such as implant-grade titanium or solid gold, will increase the initial cost but reduces healing complications. Always confirm what is included in the price—some studios charge extra for aftercare kits or specific jewelry upgrades. Planning this together with your pal ensures you both feel comfortable with the investment before the needle touches skin.
Piercing pals: frequently asked: what to check next
Going through this process together means you’ll likely have the same practical questions. Here are the answers to the most common concerns about pain, healing, and jewelry safety for your first piercings.
Picking a supportive partner makes the logistics easier. You can help each other stick to the aftercare routine, which is just as important as the initial piercing itself.
Work through Piercing Trends
No comments yet. Be the first to share your thoughts!